How we built a medium like rich text editor
Published on
Feb 5, 2019
This article synthethises the reflexion we went through during the conception and developpment of a web based rich text editor. We'll first focus on the situation which led us to that developpment, then we'll explain the different pathes we took to solve the problem and the one we finally chose.
See TL;DR at the end of the article for those of you who are speed up ;)
Table of contents
- Context
- The specs
- Text edition POC
- Design
- Implementation
- Text toolbox workflow
- Paragraph toolbox workflow
- Insertion of a tweet : a case study
- Clipboard access
- Save the edited content
- Conclusion
- TL;DR
Context
We're working for an information company. They publish many contents on their website, most of the time represented as articles or as a collection of articles (they call it topics`). As the company is working in the information business, they also post some `news`. News are small texts, which may contain tweets or links to other articles.
Editors and web managers needed a tool to be able to create and edit these kinds of contents. These will be saved in our database as an HTML string.
There alreay is many text edition tools online, but we wanted a tool which looks close to the modern text editor of medium.com. Some open source libraries are offering such solution, but most of the time, when specific needs arise, they no longer fulfill all your requirements. And here you are on the highway of awfull tweaks... Instead of spending time to develop additional features on top of an existing library (with all drawbacks implied), we decided to implement our own tool. That way, we could make it behave exactly the way we want.
Keep in mind that our text editor development took place whereas the frontend website used to publish informations was close to ritchbe put online. Technically speaking, articles are fetched from an HTTP REST API (our back office). Some of them were coming from a legacy application, and may contain some broken HTML semantic. To address this problem, we decided to develop a parser for the received HTML markup to be cleaned. This parser creates React components for, and only for HTML tags that we allow. Doing so, only tags we're sure to support are rendered, which also simplifies design and stylization.
The same parsing logic had to be kept for our text editor, as we wanted it to be WYSIWYG: the edited content is displayed like it would be in the public website, with the ability to directly edit it.
The specs
The text editor sould provide the basic fatures of text edition :
- apply some style to a portion of text (bold, italic, underlined)
- create an HTTP link
- create some paragraphs
- create titles
- create quotes
Our client also needed to insert some more specific medias :
- regular images (uploaded or picked from their image collection)
- videos (also picked from their video collection)
- tweets (by pasting the tweet URL)
- Youtube videos (by pasting the video URL)
Although such features may seems very common, complexity shows up because our text editor fits in a more global administration system. Unlike in a regular text editor, where an user can insert images browsed from it's computer, we had to direclty work with images and videos collection used in the back office application. That is, editors could reuse early uploaded or edited medias (e.g. on a previous article writing).
These requirements pushed us forward to develop our own text editor from scratch, rather than using an existing library.
Text edition POC
First attempt : AST
We first wanted to modelize the text to edit using an AST (abstract syntax tree). The HTML string was parsed and represented as a tree, the same way the DOM nodes are represented. Some simple mutation functions were written to stylize the text : make it bold, underlined, etc... At that time, we only focused on the AST part first, the rendering part beeing easier to handle would come later.
Relying on unit tests, we ensured that mutations were working as expected. We succeeded to update the AST correctly when applying mutations, e.g. the following text node
{
    type: "text",
    text: "lorem ipsum",
    children: [],
}
was succesfully transformed as a child of an other node when trying to make it bold :
{
    type: "b",
    text: "",
    children: [
        {
            type: "text",
            text: "lorem ipsum",
            children: []
        }
    ]
}
However, things were getting way more complicated from the moment we worked on more edgy cases, i.e. update some text that was starting in a paragraph and ending in an other. Selection overlapsing on different and nested tags, such as
<b>Hello <em>John Doe</em></b>, how are you ?
    |---------------|
selection start   selection end
was a daunting too. Applying such changes on the AST would have been difficult for us. In the mean time, the developer who started to work on the AST was required on an other project, so we decided not to use this AST anymore. Because it was the corner stone of the back office application, keeping it at that level of complexity and abstraction was too risky and time consuming to develop also to maintain, plus the learning curve was giving nightmares to newcomers.
The whole project beeing based on functional programing principles, AST development should have embraced these principles as well. Thing is, AST manipulation relies mostly on one ability to identifiy ancestors of a node, find, update or even remove it down through a collection of other nodes. This implies a lot of recursion and make immutabilty very hard to preserve. Although it would have been possible to achieve such result using advanced FP concepts like algebraic data types, we felt that it was definitely not a good bet to take for the project's sake.
We took an other approach to the problem, by using the DOM API to keep the tree representation and directly manipulate the view. Using this API, navigating through the DOM tree became a piece of cake, each node having the following attributes:
- childNodes,
- firstChild,
- lastChild,
- previousSibling,
- nextSibling...
See here for the complete documentation. Thanks to this complete API, removing or creating new elements was no longer a big deal too.
Second attempt : manipulating the DOM
So we started to dig in the DOM API documentation. We direclty obtained a rendered view (what we hadn't so far with the AST) and were able to edit it. However, that approach had drawbacks: working directly on the view, we no longer had a distinction between data model and the view (insert dramatic music here for a better effect). In most of modern javascript application, a data model is often used from which the view is rendered. But in our case, because the data model is the DOM tree, we're forced to directly work on the view.
Once more, MDN was our friend for this study :
- the DOM Node API let us navigate through the node tree
- we were able to get the selected text (returns a range)
- we were simply creating elements to insert with `document.createElement`
We had to be very careful with the DOM manipulation, as some `Node` methods are directly mutating the node itself. Update on the node should be done only after we have finished to compute the changes to apply. To perform this computation, we had to work on copies of these nodes, so we could edit them without changing the actual view.
We reached a working system for text mutations (bold, italic) across a single or multiple paragraphs, even when the selection was overlapsing multiple HTML tags. This was quite a big step (see the above example) !
The hard part was to produce the cleanest HTML markup as possible, e.g. for a `Hello world` text, when `Hello ` is already bold and we make `world` bold too, we initialy had two `b` tags following each other :
<b>Hello </b><b>world</b>
but this should have been simplified to :
<b>Hello world</b>
That sanitization part was performed once the new `b` tag was added to the DOM.
This was working fine, but the number of lines of code started to dangerously increase and we were discovering more and more edge cases, which were a PITA to cover. Finally, down the corner of a murky russian Stackoverflow thread we found it. The method which would have saved us all.
The holy grail : document.execCommand
We discovered `document.execCommand` \o/
This function applies some text transformations to the current selection. E.g. to bold / unbold the selection, just execute :
document.execCommand('bold')
and that's it ! Your selection is wrapped inside a `b` tag, the produced markup is very clean (remember the previous step where we had to sanitize the markup manually).
This is very neat, it enables rich text edition directly in the browser (and by the browser :p). And look at that compatibility table, green everywhere ! Icing on the cake: because we're working on `contentEditable` tags, conventional shortucts are working as well (CTRL+B for bold, etc).
Checkout all the available commands to see what's possible to do ! Needless to say, when we discovered this, we immediately stopped the previous attempt, thrown our POC to the lions and it was definitely time for a victory beer !
Considering that commands list, we almost had all needed operators to build our text editor in a maintainable way. We only had to execute the right command when clicking on the right button.
Design
The text editor is composed of two distinct sets of tools:
- the paragraph toolbox (displayed when the cursor is on an empty paragraph)
- the text toolbox (displayed when a text is selected)

The paragraph toolbox

The text toolbox
Paragraph toolbox
The paragraph toolbox is used to insert medias in a new paragraph. When clicking on the `image` button, it opens a media picker. In this media picker, users can then search an image to insert from our database, upload a new image, edit its caption, crop it, etc.
The `video` button behaves almost the same way: it opens the media picker for videos.
For tweets and youtube videos insertion, a simple `text` input is displayed on the empty paragraph so the user can type in the URL of the media to insert. The tweet or the video is inserted when this little form is submitted. This use case is detailed in the "Insertion of a tweet" chapter below.
Implementation
We're using
In the following part of this article, we'll assume that you're comfortable with these technologies. If you're not, please take some time to understand the core principles of them.
View
The text editor is a react component :
// TextEditor :: Props -> React.Component
export default ({
  click,
  editorName,
  keyDown,
  paste,
  selectText,
  children,
}) =>
  <div className="text-editor">
    <ParagraphToolbox editorName={editorName} />
    <TextToolbox editorName={editorName} />
    <article
      data-editor-name={editorName}
      className="edited-text-root"
      contentEditable={true}
      suppressContentEditableWarning={true}
      onClick={e => click(editorName, e.target)}
      onKeyDown={keyDown}
      onPaste={paste}
      onSelect={() => selectText(editorName)}
    >
      {children}
    </article>
  </div>
As you can see, the view component is pretty simple. The two toolboxes are also components. All the bindings are applied to the `article` tag. Inside that tag, we render the actual text to edit using the `children` prop. We'll first explain how the `TextEditor` component itself works, then we'll dig into the `ParagraphToolbox` and `TextToolbox` components.
As we can have many TextEditor instances on a single page, they have to be differenciated. To do so, we simply give them a name (notice the `editorName` prop).
About other parameters :
- `contentEditable={true}` applies the `contenteditable` attribute to the `article` node so we can edit its content.
- `suppressContentEditableWarning={true}` indicates to react not to print a warning in the console about content editable nodes.
- `onClick={e => click(editorName, e.targe)}` the handler to call when we click on the edited text. It will be used to display the paragraph toolbox when clicking on a previously inserted media.
- `onKeyDown={keyDown}` the handler to call when we press a key down. It will be used to insert new empty paragraphs in the text editor.
- `onPaste={paste}` the handler to call when we want to paste some text from the clipboard. We will read the user clipboard content to fetch copied text.
- `onSelect={() => selectText(editorName)}` the handler to call when a text inside this node is selected.
This event is fired either when some text is selected using shift key combined with arrow keys, or by highlighting text with the mouse. It will mostly be used to show or hide toolboxes.
All the above handlers are dispatching redux actions. This allows us to observe these actions inside epics (thanks to `redux-observable`) and to apply desired changes in the application.
In the end, this is how we use this component :
<TextEditor editorName="article-editor" main>
  {isEmpty(componentInfos)
    ? <p></p>
    : indexedMap((componentInfo, index) =>
        <Widget
          component={componentInfo}
          id={index}
          key={index}
        />
      )(componentInfos)
  }
</TextEditor>
The `TextEditor` is wrapping a `Widget` component tree, which is the component responsible to render the HTML tags we support (remember what's explained in the context section). The resulting sanitized components are those which will be edited.
The `main` property indicates if this instance of the TextEditor is the main instance used on the page. We're using this prop to filter some actions that only needs to be performed over that main text editor (see the container chapter below).
Container
// mapDispatchToProps :: (Action * -> State, Props) -> Props
const mapDispatchToProps = (dispatch, props) => ({
  click: compose(dispatch, click),
  keyDown: pipe(
    when(
      compose(equals(13), prop('keyCode')), // the <enter> key
      tap(e => e.preventDefault()),
    ),
    e => keyDown(props.editorName, e.keyCode),
    dispatch,
  ),
  clear: compose(dispatch, clear),
  paste: pipe(
    tap(e => e.preventDefault()),
    paste,
    dispatch,
  ),
  initialize: compose(dispatch, initialize),
  selectText: compose(dispatch, selectText),
})

// didMount :: Props -> Action.INITIALIZE
const didMount = ({ initialize, main }) => !isNil(main) && initialize()

// willUnmount :: Props -> Action.CLEAR
const willUnmount = ({ clear, main }) => !isNil(main) && clear()

// lifecycles :: React.Component -> React.Component
const lifecycles = compose(
  componentDidMount(didMount),
  componentWillUnmount(willUnmount),
)(TextEditor)

// TextEditor :: Props -> React.Component
export default connect(
  null,
  mapDispatchToProps,
)(lifecycles)
As we want our component to be connected to the redux store (in order to dispatch actions and to get state values), we're using the `connect` method of the `react-redux` library. We're also hooking into the component's lifecycles using the react-functional-lifecycle library to dispatch redux actions when the component is mounted and will be unmounted:
- `didMount`: dispatches an `INITIALIZE` action for the main text editor to indicate when it is ready. An epic is listening to this event and register events listeners on the `window.mousedown` event. This action only has to be dispatched once when there are multiple text editor instances on the same page. The `window.mousedown` listener is used to hide paragraph and text toolboxes when we click outside of a text editor.
- `willUnmount`: dispatches the `CLEAR` action for the main text editor when it will be unmounted. This action is observed by the same epic to unregister the `window.mousedown` event listener.
Epics
Our epics are exposed with redux-observable.
All the DOM manipulations and media insertion logic is done here. Notice that observable streams are created from both actions and window events. To have a better understanding of what's inside epics, we'll present the paragraph and text toolboxes ones.
Text toolbox workflow
The text toolbox contains a set of buttons to apply text mutations over the selected text :
The text toolbox
The component's view basically consist into a list of buttons :
<ul>
  <li>
    <button
      className={`ttbx-mutation icomoon-font ${isBold ? 'active' : ''} ${isTitle ? 'disabled' : ''}`}
      onClick={() => mutate('BOLD')}
      disabled={isTitle}
    >4</button>
  </li>
</ul>
Example of the bold / unbold button Like the `TextEditor` component, the `TextToolbox` is connected to the redux store. On the above example, we're using `isBold` and `isTitle` properties which are coming from the state :
export const INSTANCE_INITIAL_STATE = {
  visible: false,
  top: 0,
  isLinkCreatorOpened: false,
  range: null,
  isBold: false,
  isItalic: false,
  isUnderline: false,
  isTitle: false,
  isQuote: false,
  isLink: false,
}
The `isTitle` flag is used to disable the bold / unbold button when the selected text is a title (we always want titles to be bold). The `isBold` flag is used to whether highlight or not the bold / unbold button when the selected text is aleady bold or not (this button behavior is similar to the one you'll find on any wording processor).
When clicked, the button dispatches a `MUTATE` action. That action is observed by an epic which will actually perform the selected text mutation.
How these flags values are determined ?
A dedicated epic is executed both when we open the text toolbox, and also when applying a text mutation. Selected text's state is automagically guessed using `document.queryCommandState` function. This function returns a boolean indicating if the selection is of the given type :
const isBold = document.queryCommandState('bold');
Knowing that, it's pretty easy to determine the state of every text toolbox flags from another epic :
// refreshTextToolboxStateEpic :: Observable Action Error -> Observable Action _
export const refreshTextToolboxStateEpic = (action$, state$, { window }) => action$.pipe(
    ofType(SHOW_TEXT_TOOLBOX, MUTATE),
    map(action => [ action, window.getSelection().getRangeAt(0) ]),
    map(([ action, range ]) => [ action.editorName, ({
      isBold: document.queryCommandState('bold'),
      isItalic: document.queryCommandState('italic'),
      isUnderline: document.queryCommandState('underline'),
      isTitle: isInParent('h2')(range),
      isQuote: isInParent('blockquote')(range),
      isLink: isInParent('a')(range),
    })]),
    map(apply(refreshButtonsState)),
    logObservableError(),
  )
How the text is mutated ?
Once again, we're using an epic for that! Recall the click on a text toolbox button dispatches an action:
onClick={() => mutate('BOLD')} // will dispatch a `MUTATE` action having the `BOLD` mutation
and our epic is observing this `MUTATE` action to apply the correct mutation :
// mutationEpic :: Observable Action Error -> Observable Action _
const mutationEpic = action$ =>
  action$.ofType(MUTATE).pipe(
    map(prop('mutation')),
    filter(complement(equals('LINK'))),
    tap(cond([
      [equals('TITLE'), () => document.execCommand('formatBlock', false, 'h2')],
      [equals('PARAGRAPH'), () => document.execCommand('formatBlock', false, 'p')],
      [equals('ITALIC'), () => document.execCommand('italic')],
      [equals('BOLD'), () => document.execCommand('bold')],
      [equals('UNDERLINE'), () => document.execCommand('underline')],
      [equals('QUOTE'), () => document.execCommand('formatblock', false, 'blockquote')],
      [equals('UNLINK'), () => document.execCommand('unlink')],
    ])),
    ignoreElements(),
  )
This epic executes the `document.execCommand` function, which is applying the mutation over the selected text. And voilà ! Mutating the text is as simple as that !
Paragraph toolbox workflow

The paragraph toolbox
The paragraph toolbox is only displayed when the cursor is in an empty paragraph. Remember we're dispatching a `SELECT_TEXT` action when a text is selected inside the `TextEditor` component:
{ /* TextEditor component's view */ }
<article
  onSelect={() => selectText(editorName)}
>
  {children}
</article>
This action is also dispatched when moving the cursor, so it make it easy to identify when we're on an empty paragraph and display the paragraph toolbox. Once more, all this logic is done in an epic :
// showParagraphToolboxEpic :: Epic -> Observable Action.SHOW_PARAGRAPH_TOOLBOX
export const showParagraphToolboxEpic = (action$, state$, { window }) =>
  action$.pipe(
    ofType(SELECT_TEXT),
    map(action => [ action.editorName, window.getSelection()]),
    filter(compose(isEmptyParagraph, last)),
    map(([ editor, selection]) => [
      editor,
      getParagraphTopPosition(selection),
      getNodeIndex(editor, selection.anchorNode),
    ]),
    map(apply(showParagraphToolbox)),
    logObservableError(),
  )
This epic show the paragraph toolbox for, and only for the editor having the right `editorName`. The absolute position at which the paragraph toolbox will be shown is computed from there. We also store in the redux state the node index corresponding to the paragraph in which the cursor is. It will later be used to insert medias chosen with the paragraph toolbox.
Unlike the text toolbox buttons, paragraph toolbox buttons each behave differently. Explaining them all will be too long, we'll rather focus on an speaking example. For other cases, feel free to check the source code !
Insertion of a tweet : a case study
In this chapter, we will try to give a better insight of how the whole thing is working, by breaking down a simple use case and the components involved in it's workflow. The main idea of this use case was to give users the simplest way to insert a tweet, only by pasting a link, without any HTML edition required.
Getting the HTML markup from twitter
Keep in mind that our main goal here is to obtain the cleanest possible HTML representation of our tweet, so it can lately be saved to the API. That way it will be easy for us to parse it as a component, and finally display it to the end user in the front end application. The following chart will give you an overview of the actions flow :
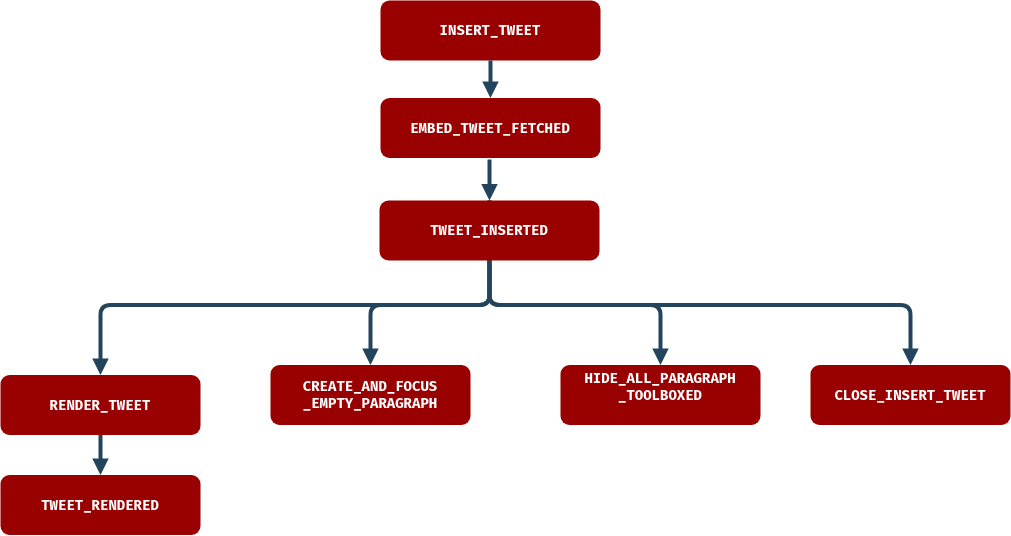
History begins as soon as an user submits the little tweet insertion form. Thanks to `redux` action creators, the url of the tweet he wants to insert is boxed along with the `INSERT_TWEET` action, which is observed by a first epic.
The HTML markup of a tweet can be obtained by using the twitter API, see here. Because of Cross Origin restriction imposed by this API, we cannot directly request it from a browser application. To address this issue, we created a dedicated endpoint in our API. N.b: this has been mimiced in the `server` folder of the POC project linked at the end of this article.
The first epic is only responsible to call that endpoint and dispatch a `EMBED_TWEET_FETCHED` action which carries out the obtained HTML markup in its payload. It's always convenient to isolate API calls in dedicated epics so errors can be properly catched and displayed to the end user when something goes wrong. Cool thing is, keeping epics as atomic as possible (observe an action, do one thing, then dispatch another action) allow them to be easily tested. That is, your fellow developpers dont want to break your legs when the prod crashes (which will happend, but that's another story).
Inserting the embed tweet into the DOM
The previous action is observed by another epic, which will insert the embed tweet code into the DOM (as epic are meant to deal with side effects, it's the proper place in the project to do that). The actual tweet rendering from this embed markup will be done later. How is that ?
// insertTweetEpic :: Epic -> Observable Action.TWEET_INSERTED Action.ERROR
export const insertTweetEpic = (action$, state$) => action$.pipe(
  ofType(EMBED_TWEET_FETCHED),
  withLatestFrom(state$),
  mergeMap(([ action, state ]) => from(
    insertTweetNode(action, state.TextEditor),
  ).pipe(
    map(apply(tweetInserted)),
    catchError(() => of(error(action.editorName))),
  )),
)

// insertTweetNode :: (Object, State.TextEditor) -> Promise
const insertTweetNode = ({ editorName, url, html }, textEditor) => new Promise(resolve => {
  const tweetId = getTweetIdFromUrl(url);
  const uid = uniqid(tweetId);

  const newNode = pipe(
    tap(e => e.innerHTML = renderToString(UnconnectedTweet(tweetId, uid), 'text/html')),
    prop('firstChild'),
  )(document.createElement('div'));

  insertNewNodeAtIndex(
    newNode,
    textEditor.ParagraphToolbox[editorName].targetNodeIndex,
    editorName,
  );

  const originalHtmlMarkup = pipe(
    tap(e => e.innerHTML = html),
    // only grab the `blockquote` tag, not the `script` tag
    e => e.firstChild.outerHTML,
  )(document.createElement('div'));

  resolve([ editorName, tweetId, uid, originalHtmlMarkup ]);
})

// insertNewNodeAtIndex :: (Element, Number, String) -> _
export const insertNewNodeAtIndex = (newNode, targetIndex, editorName) =>
  getEditor(editorName).replaceChild(
    newNode,
    nth(targetIndex, getRootNodesAsArray(editorName)),
  );

// getRootNodesAsArray :: String -> [Node]
export const getRootNodesAsArray = editorName => Array.from(
  getEditor(editorName).childNodes,
)

// getEditor :: String -> Node
export const getEditor = editorName => document.querySelector(
  `.edited-text-root[data-editor-name="${editorName}"]`
)
As you can see, the `insertTweetNode` function returns a Promise, it provide us a nice way to handle failures at that step of the
process. What does that function do ?
- Using a combination of react `renderToString` utility, one of our parsers, and the HTML markup provided by the twitter API in the previous observable, it creates an HTML representation of the tweet formatted as we need it to be.
- Then, using an `insertNewNodeAtIndex` utility, we replace the empty paragraph from where the tweet insertion form was shown by the new node created at the previous step (that paragraph index has early been saved into the paragraph toolbox state when the `SHOW_PARAGRAPH_TOOLBOX` action has been reduced).
- The promise is finally resolved with data such as the editor name, because we need to carry these information out during the whole process.
Once the tweet has successfully been inserted, a `TWEET_INSERTED` action is dispatched by the epic. Otherwise, an error is catched and displayed to the user. Notice that the kind of error we handle here is not of the same type than in the previous observable. Errors that may occur here could only be DOM related.
Rendering the inserted tweet and going back to the original state
The `TWEET_INSERTED` action is observed by four epics (and here we gain full benefit of working with observable streams) :
- One that takes care of systematically insert and focus a new paragraph after a media has been inserted (for pure UX concerns),
- One that will hide the paragraph toolbox (we no longer need it to be displayed as a consequence of the previous action: a new paragraph has been inserted),
- One that will close the tweet insertion form so that the user is not annoyed when the paragraph toolbox is lately shown,
- The last wich only maps the payload of the `TWEET_INSERTED` action payload to a new `RENDER_TWEET` one. Although it can sound a bit overkill to have an epic that does apparently "nothing", it help us keep our action stream crystal clear.
Guess what ? That action is observed too !
// renderTweetEpic :: (Observable Action Error, Observable State Error, Object) -> Observable Action _
export const renderTweetEpic = (action$, state$, { window }) =>
  action$.pipe(
    ofType(RENDER_TWEET),
    filter(() => window.twttr),
    map(action => ({
      ...action,
      element: document.getElementById(`tweet-${action.uid}`),
    })),
    filter(prop('element')),
    mergeMap(({ tweetId, originalHtmlMarkup, element }) => Promise.all([
      tweetId,
      originalHtmlMarkup,
      window.twttr.widgets.createTweet(tweetId, element),
    ])),
    map(([ tweetId, originalHtmlMarkup ]) => tweetRendered(tweetId, originalHtmlMarkup)),
    logObservableError(),
  )
That epic check for the twitter SDK presence in the window object using the `filter` operator. Noticed how we pass the window object as a dependency of the epic ? This life saving feature is given by rxjs 6 and help us to keep our epics as pure as possible. By letting us the ability to mock the window object (or our fetchApi, which also comes as a dependency), testing is way simpler. Here is a brief explanation of what the epic actually do :
- The tweet widget is created by a call to the Twitter SDK, which relies on the `tweetId` extracted from the URL and an HTML element. Those two elements are derived of the original action payload (remember how we map them in the resolved promise of the `insertTweetNode` function).
- Once this has be done, we dispatch the last (phew !) `TWEET_RENDERED` action to resolve our observable stream.
That final action is reduced so the rendered tweet markup is appened to a collection of others rendered tweets. We do that because at some time, we will need to actually save the content of our text editor in the database. Due to the SDK call, the tweet widget rendering is totally messed up with some iframe and shallow content. By storing the original embed HTML markup in the application state, we have a way to recover the clean part of each tweet and to only persist a minimal and clean string.
Clipboard access
Using `contentEditable` tags rather than regular form elements such as `input` has drawbacks. Say that our end users need to paste text from other sources to write articles. Doing so in an input element, everything works just great. You get rid of non textual elements, and end up with a raw string ready to be submitted. When pasting in a `contentEditable` element, things are way different.
The browser will try to render the pasted text as close as possible from of the original copied text, resulting in massive and ugly inline style everywhere. This is not what we want, because we tried to have a clean HTML semantic by controlling how elements are rendered (remember we wrote a parser for that).
We had to find a way to sanitize (once more !) the user clipboard, to ensure only raw text is pasted from external sources. Problem is, clipboard interaction is one of the most obvious security breach in web application, because it implies a direct communication between javascript and the external world with almost no way to control what's comming from it. In the past, several workaround involving extreme methods such as `iframe` and even `flash` (brrrr) were used. Lately, the well known `document.execCommand('paste')` came to the rescue, but was still very limitated due to security concerns. See that link for details.
A more recent approach was to use the new clipboard API, which provide an elegant and secured way to access the user clipboard (as soon as he gaves the app the permission to do so) and let us work with Promises in return. This feature is still at experimental state and the API is likely to evolve in the future. We use it anyway, because it's what fits our user need the best, and we were lucky enough for the compatibility tables to match his environment.
If you recall, an `onPaste` handler was binded to the article editor. It is triggered either when user pastes text from the shortcut key combination CTRL+V or via contextual menu. That handler prevents the browser default behavior and like every other handlers of this component, dispatches a `PASTE` action which is observed by an epic:
// checkClipboardAccessEpic :: Epic -> Observable Action.PASTE_GRANTED Action.DISPLAY_CLIPBOARD_WARNING
const checkClipboardAccessEpic = action$ => action$.pipe(
  ofType(PASTE),
  mergeMap(() => navigator.permissions.query({'name': 'clipboard-read'})),
  mergeMap(ifElse(
    isClipboardAccessGranted,
    () => navigator.clipboard.readText().then(pasteGranted),
    () => [displayClipboardWarning()],
  )),
  logObservableErrorAndTriggerAction(displayClipboardSupportError),
)
This first epic check for the clipboard access and dispatches an error message if that permission is not granted. When everything is fine, a `PASTE_GRANTED` action carrying the pasted text read from the clipboard is dispatched. Another epic observes that action and will insert the pasted text at the right place.
// pasteCopiedTextEpic :: Epic -> Observable Action.TEXT_PASTED
const pasteCopiedTextEpic = (action$, state$, { window }) =>
  action$.pipe(
    ofType(PASTE_GRANTED),
    map(prop('textToPaste')),
    tap(textToPaste => ifElse(
      isEmptyParagraph,
      pasteTextInParagraph(textToPaste),
      pasteTextInExistingText(textToPaste),
    )(window.getSelection())),
    map(textPasted),
    logObservableError(),
  )
Two cases are to be distinguised:
- When pasting in an empty paragraph, things are quite simple. We only replace the paragraph `innerHTML` by the user text.
- When pasting in an already existing paragraph, its content has to be updated so the new text is inserted between the existing one (if the selection is empty) or replace the current selection. This implies to manipulate strings and this is delegated to an external `pasteTextInExistingText` function, to keep the epic as clear as possible.
Once the text has been pasted, a `TEXT_PASTED` action is dispatched so the observable stream is resolved :).
Save the edited content
To save the edited content, we simply grab the HTML string inside the DOM node of the TextEditor component having the `contentEditable={true}` attribute. This HTML string is our edited text, so we can send it to our backend to save the edited text. However, there is an extra step to take before.
As we can insert some third party medias (such as tweets and youtube videos), the rendered HTML markup of these medias are present in the HTML string to send. We definitely do not want to save the rendered representation of these medias, but instead their embed markup. For instance, to render tweets, we're using the embed HTML markup and then we make a call to the twitter SDK which would render a nice and complete tweet from the embed code.
The rendered representations are always more verbose than the markup code, that's why we prefer to store only the embed markup in our DB. Additionaly, the legacy text edition application was already working with embed code to display tweets, so we wanted to make this TextEditor compatible with the contents previously edited with that legacy app.
This brings us to the `sanitization` step, where we replace any rendered representation of complex inserted media by their embed markup. To do so, we have to keep the embed markup of the media in the application state. We also have to identify to which embed markup is correponding the rendered representation (e.g. for tweets, we're using the tweet id to make this matching).
So, when we want to send an HTML string to the backend, we first use the `sanitizeContentBody` function :
import { pipe, tap } from 'ramda'

// createWrapper :: String -> Element
const createWrapper = body => pipe(
  tap(e => e.innerHTML = body)
)(document.createElement('div'))

// createOriginalTweetElement :: Element, Object -> Element
const createOriginalTweetElement = (tweetElement, originalHtmlMarkups) => pipe(
  tap(wrapper => wrapper.innerHTML = originalHtmlMarkups[tweetElement.dataset.tweetId]),
  wrapper => wrapper.firstChild,
)(document.createElement('div'))

// sanitizeTweet :: Element, Object -> Void
const sanitizeTweet = (tweetElement, originalHtmlMarkups) => tweetElement
  .parentNode
  .replaceChild(
    createOriginalTweetElement(tweetElement, originalHtmlMarkups),
    tweetElement
  )

// sanitizeTweets :: Object -> Element -> Element
// Reverts rendered tweets to their embed markup.
const sanitizeTweets = renderedTweets => pipe(
  tap(wrapper => Array
    .from(wrapper.getElementsByClassName('i24-rendered-tweet'))
    .reverse()
    .map(tweetElement => sanitizeTweet(tweetElement, renderedTweets))
  )
)

// sanitizeContentBody :: Object -> String -> String
export const sanitizeContentBody = renderedTweets => pipe(
  createWrapper,
  sanitizeTweets(renderedTweets),
  wrapper => wrapper.innerHTML,
)
Doing so, we're sure to persist a valid string in the database :) The saved string can then be used by the public website to display the article.
Conclusion
Phew ! That was a long ride ! Congratulations for staying with us so far ;) At that time of writing, the text editor is still being improved to follow feedbacks given by end users. We described it as it is when we wrote this article.
A possible improvement would be the ability to move some selected text by dragging and dropping it at the desired place. This could lead to an other blog post.
It was a good excercise to develop. In the end, the concepts are most of all very simple. We learned a lot on the native browser functionalities and we are amazed by the possibilities of these sofwares ! We also hope this article helped you to discover new concepts :)
You can clone the text editor and see the code for all other features on this repository : https://github.com/jaljo/rich-text-editor. Thanks for reading, that's all folks !
TL;DR
We built a medium like text editor to write articles. It allows to embed images and videos from our collection, tweets and youtube videos. It also has the word processing features we find on common text editors. We used the `document.execCommand` function to apply text mutations. Our app is using react, redux and redux-observable. We also built an HTML parser to have full control over the text to render.
See the full article for details and for a link to the source code ;)
Joris Langlois and Nicolas Mure from knplabs.com.

Written by


Comments